Motorola releases Android 9 Pie for Moto Z3 Play in the U.S.

Motorola released Android 9 Pie to the Moto G6 a few days ago and now Motorola releases Android 9 Pie for Moto Z3 Play in the U.S. The Moto Z3 Play becomes the second Motorola handset officially sold in the U.S. to receive the update to Pie.
Android 9.0 Pie improves your mobile experience from the new Intuitive Navigation and Recent App, an improved Do Not Disturb mode and a colorful settings menu, to anticipated longer battery life and revamped split screen. Android Pie also brings a redesigned Quick Settings, simplified volume controls, an easier way to manage notifications and more.
With the release notes having just popped up, it may take some time before all Moto Z3 Play units in the country receive the update to Pie.
New Changes of Android 9 Pie for Moto Z3 Play
Usability
- New navigation gestures: one-button nav lets users conveniently navigate with just one button. This updated version is just as easy to use, but with helpful new gestures such as swiping up to access the recent app carousel.
- Adaptive battery: go longer with a single charge. It prioritizes battery power on the apps you use the most and applies restrictions on the ones you use the least. Battery saver can now be activated from 70% or below.
- Adaptive brightness: fewer manual adjustments to perform better. Machine learning takes notes of your habits and automatically adjusts to your activities.
- Quick settings improvements: no shortcuts anymore (toggles are no longer expandable, but press and hold a toggle goes to the setting detail). The icons have been redesigned with a rounded concept and circular background.
- Rotation key: Android Pie presents a temporary rotation even with the auto-rotate disabled. A rotation button is displayed whenever it detects that your phone has changed
orientation. - Dual SIM settings: by pressing the SIM Card toggle in the Quick settings, a full screen activity is shown to select preferred SIM and manage data usage.
- Redesigned Settings app: colorful icons for each selection with a circular background. It also warns if the phone is muted or in Do not disturb mode. Order, name and placement of the settings options have not changed.
- Better screenshots: another handy Android 9.0 feature is the addition of the virtual screenshot button/shortcut to the power menu (the old power and volume down method (still works). You can also edit your screenshots immediately after taking them and a delete option is also available.
- Improved audio controls: the volume slider is now vertical and close to the volume buttons. Users can switch between ring, mute and vibrate-only mode. Plus, media controls are now the default volume adjusted, and Do not disturb cannot be turned on/off via the volume keys anymore. Bluetooth device volumes are also accessed whenever connected. As usual, ‘Volume Up + Power’ changes the ring mode to vibrate.
- Zoom in text: you can finally manage the annoying mistakes of selecting incorrect text. Now, when you press and hold a phrase or text, it will automatically magnify at the pointer. It also helps you read small text and select words precisely.
- New and updated emoji: 157 new emojis, as well as a gender-neutral concept.
- Settings icon while on PIP mode: tapping the new settings icon brings you to the app’s PiP settings, where you can enable or disable the feature.
- Other UI changes: time is now on the left side and the search bar is now rounded. There is a new task manager/
recents list that now shows a horizontal list instead of a vertical one and includes the split screen capabilities by pressing the app icon above the thumbnail. Dragging the split screen border will select the app you want in full screen.
Notifications
- Notification UI changes: notifications now have rounded corners. It also supports inline images/stickers and distinguishes single/group conversations.
- Dismissing notifications: Android Pie will now suggest a couple of actions to you for the type of notifications you usually dismiss. It will offer to turn off frequently dismissed notifications by asking you if you would like to stop seeing these notifications or keep showing them.
- Notification bar: maximum of 4 visible notifications in the status bar before the list is truncated with a dot to indicate more unseen icons.
- Manage notifications: a shortcut at the bottom of the cards in the notification shade that allows you to see a user-facing list of recent notification activity. If it’s something annoying, you can flip the toggle right there to disable unwanted notifications in the future.
Performance
- Performance improvements: applications will launch faster and use less memory, gaining performance and efficiency improvements.
- Power efficiency: refinements to Doze, App Standby and Background Limits to improve battery life.
- Background App privacy: the system restricts access to the phone’s microphone, camera and other sensors (other than GPS). A persistent notification is shown if an app needs access while in the background.
- Bluetooth enhancements: simultaneous connection of up to 5 Bluetooth audio devices. However, there is no option for simultaneous playback: users need to choose the device to be used. Android 9.0 also remembers the last volume level for paired devices.
- Wi-Fi optimization: Wi-Fi hotspot goes OFF in case of no connection. It disables automatically, preventing others nearby from connecting to your network.
- Stability improvements: includes changes that fix bugs and improve the stability of your phone.
Security
- Security enhancements: an alert tone will be heard when a call is being recorded to all parties. The pattern unlock also hides the swipe trail, instead of simply leaving the trail visible until the phone has fully unlocked. Better for security.
- Data encryption: Android Pie will now perform client-side data encryption and/or decryption on the user’s phone: authentication is required (password, PIN, pattern), plus
Google backs up all information to the cloud and hacker attacks become much more difficult. - DNS over TLS support: it creates a secure connection to the DNS server before DNS queries and responses happen. For example, someone monitoring the connection will have a harder time seeing what you’re doing.
- HTTPs by default: all applications built for Android Pie onwards will send and receive data via HTTPS by default, ensuring your data is better protected as you communicate with the app’s servers, especially public Wi-Fi.

In the ever-evolving world of smartphone technology, convenience and efficiency are paramount. Samsung, as a leader in innovation, recognizes this and offers users the incredible swipe-to-type and cursor control feature on its keyboard. This intuitive functionality allows you to effortlessly glide your finger across the keyboard, spelling out words with remarkable ease, or precisely navigate through text using a cursor.
This guide will be your key to unlocking the potential of these features, showing you how to enable swipe-to-type and cursor control on your Samsung keyboard. By delving into your device’s settings, you will discover the simple, yet powerful steps needed to harness these capabilities. Whether you’re a fan of swift, gesture-based typing or require pinpoint accuracy in editing text, Samsung’s keyboard offers you the tools to customize your digital communication experience. Join us as we explore the intricacies of enabling swipe-to-type and cursor control, elevating your typing and editing skills to new heights.
Enable the swipe to type or cursor control feature on Samsung keyboard
- Open the Settings menu, scroll down, and tap on the General management option.
- Then, tap on Keyboard list and default.
- Now, click on the Samsung Keyboard option.
- Here, scroll down and tap on the Swipe, touch, and feedback option.
- Click on the Keyboard swipe controls option.
- Finally, you can turn on the Swipe to type or Cursor control feature.
We hope that this article has been able to provide you with some helpful tips and tricks for How to enable the swipe to type or cursor control feature on Samsung keyboard. Now you can share your experiences or capture important information without any hassle!

In today’s fast-paced digital world, content creation has become a crucial aspect of communication.
Whether you’re a business owner, educator, or content creator, the ability to generate engaging audio and video content is crucial.
That’s where Fliki AI steps in, offering a seamless solution to transform text into captivating videos and lifelike speech.
In this blog post, we’ll dive into the world of
Unveiling Fliki AI: Transforming Text to Videos and Speech

Fliki AI is a cutting-edge text-to-video and text-to-speech creator that empowers individuals and businesses to craft high-quality multimedia content within minutes.
It’s designed to bridge the gap between text-based information and dynamic audiovisual presentations.
With Fliki AI, you can bid farewell to the complexities of video editing and laborious voiceovers. Whether you’re explaining complex concepts, narrating stories, or presenting information, Fliki AI has you covered.
How to Start Your Fliki AI Free Trial: Easy Step-by-Step Guide
Getting started with Fliki AI’s free trial is a breeze! Follow these simple steps to activate your trial and begin exploring the fantastic features it offers.
Step 1: Click on the special link provided to access the right page for activating your free trial.
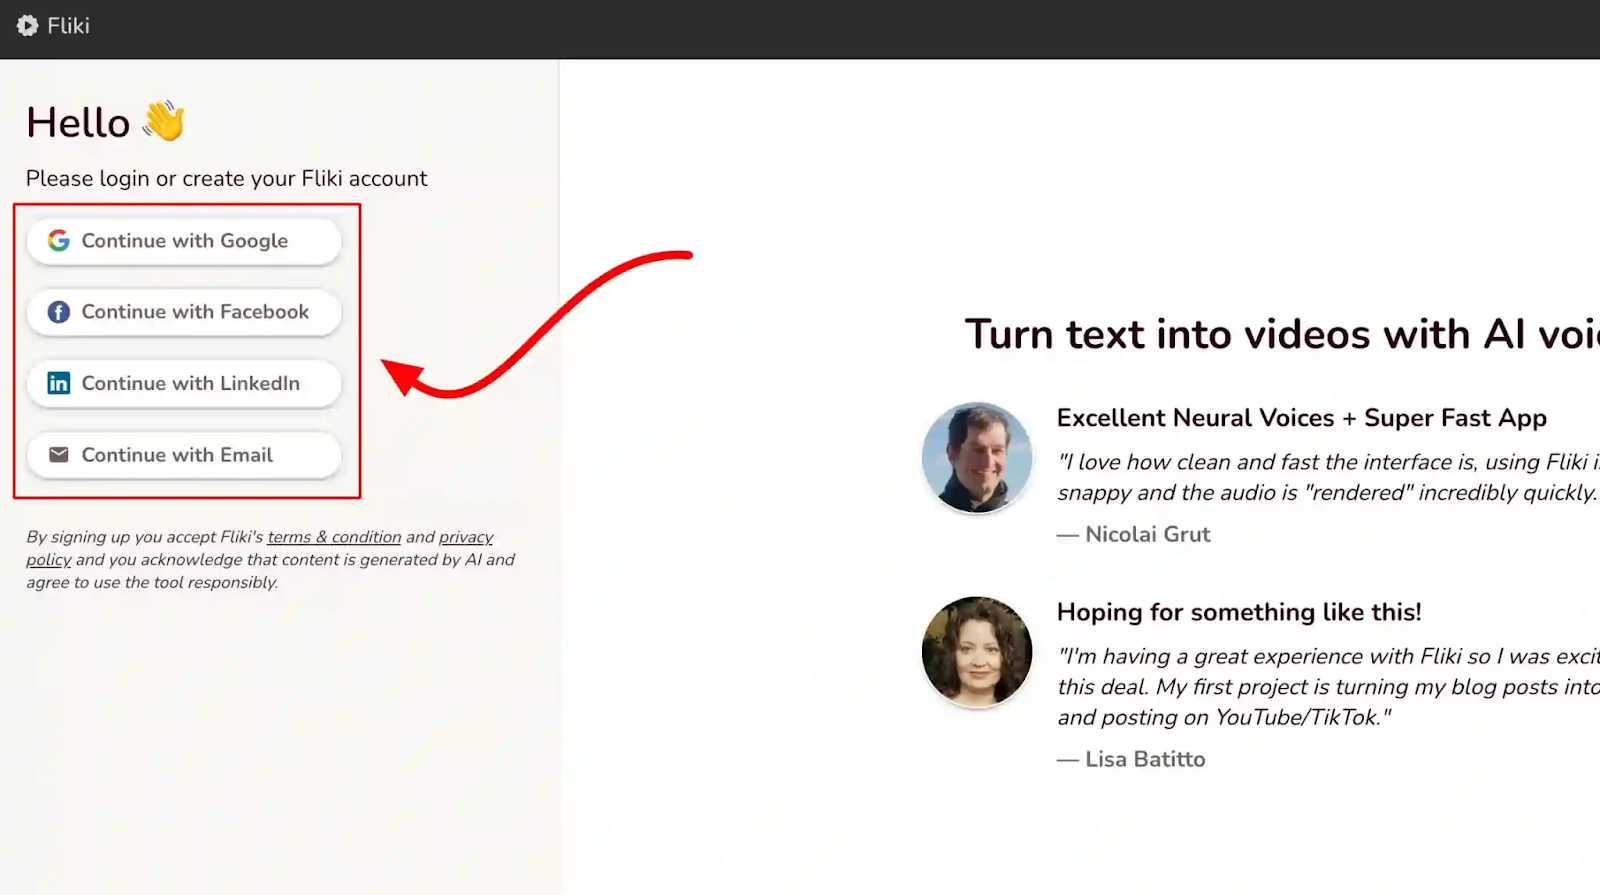
Step 2: Look at the picture below and tap the “signup for free” button.

Step 3: On the left side, you’ll see options to either log in if you already have an account or create a new account. Choose one and sign in.
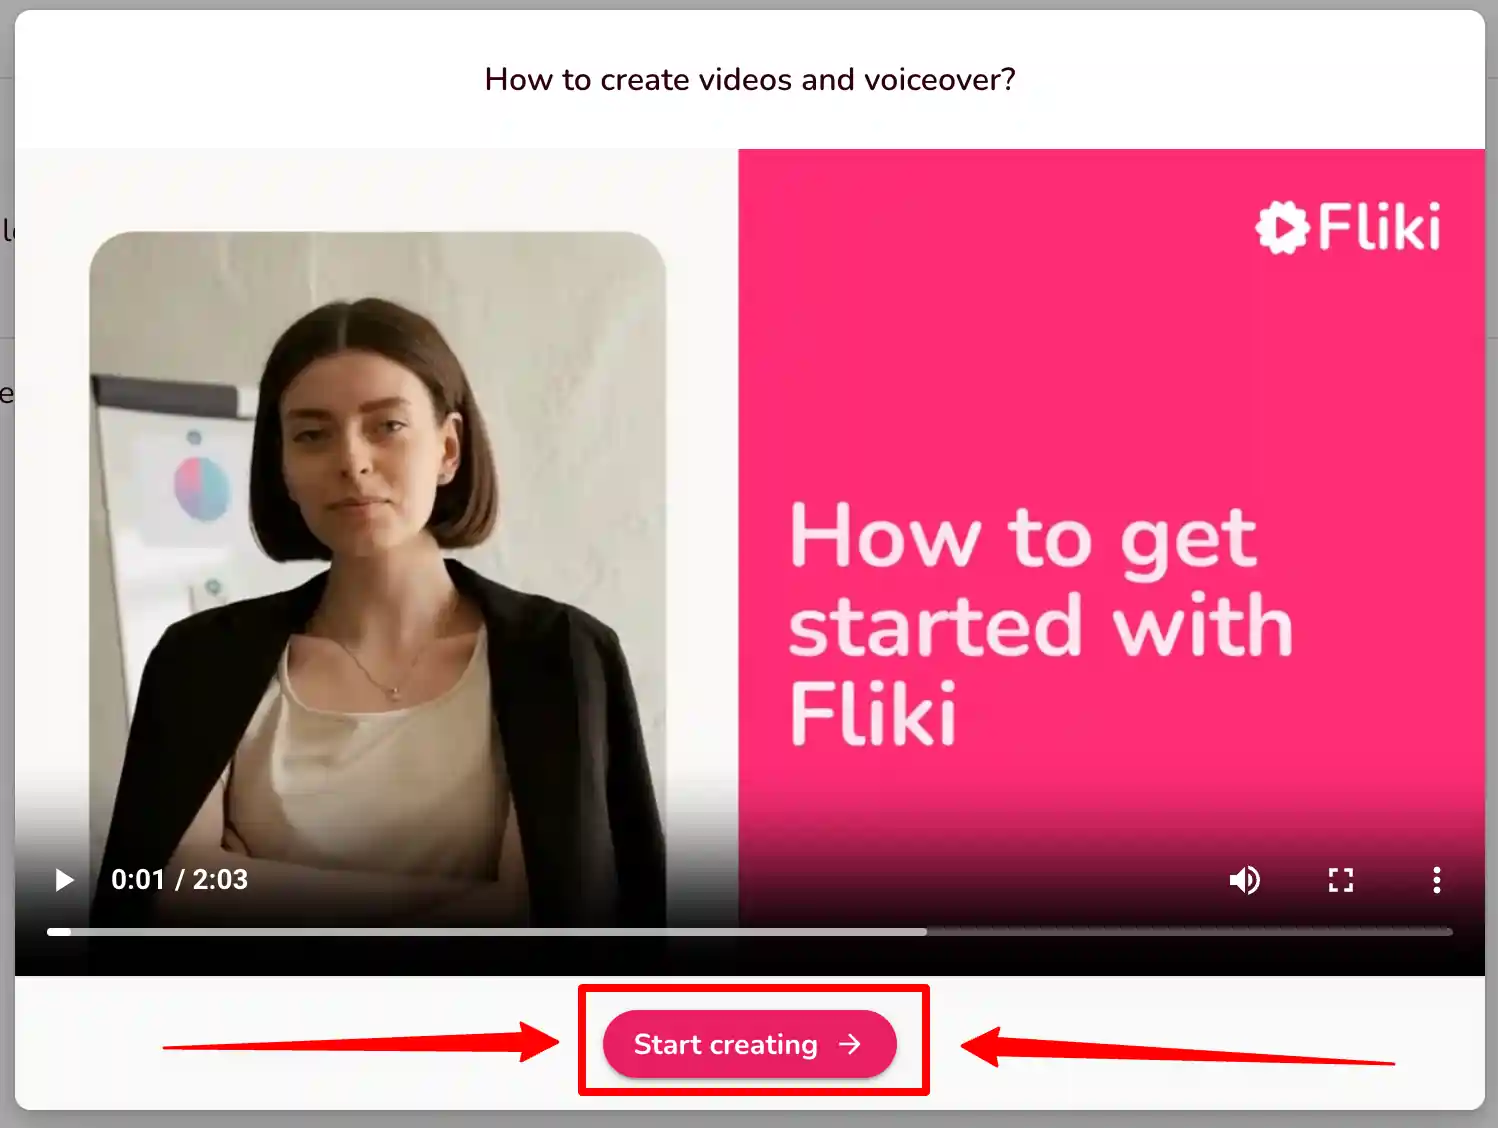
Step 4: Click the “start creating” button.
Congratulations! You’re all set to use Fliki AI’s Free Trial without any charges.
The best part is, you don’t need to provide any credit card information to activate the free trial, and there’s no limit to how much you can try it out.
The Power of Fliki AI Features:

Effortless Text-to-Video Conversion: Fliki AI streamlines the process of turning your written content into captivating videos. Simply input your text, and Fliki AI works its magic by generating engaging visuals that complement your message.
Natural Text-to-Speech: With its advanced text-to-speech capabilities, Fliki AI offers a range of natural-sounding voices to choose from. Your content will come to life with human-like intonation, making it more relatable and engaging for your audience.
User-Friendly Interface: Fliki AI boasts a user-friendly interface that requires no technical expertise. It’s designed for everyone, regardless of their familiarity with video editing or audio production.
Customization Options: Customize your videos with a variety of styles, fonts, and layouts to match your brand’s identity. Tailor your content to resonate with your target audience effectively.
Library of Visuals: Access a vast library of images and animations to enhance your videos further. Fliki AI ensures that your content is visually appealing and professional.
Founder’s Vision: Empowering Content Creation
Behind Fliki AI’s innovation stands Sabir Ahmed and Atul Yadav, visionary entrepreneurs who recognized the need for simplifying content creation.
Their vision was to provide individuals and businesses with a tool that democratizes multimedia content production, enabling anyone to communicate their ideas effectively.
The founder’s dedication to democratizing content creation aligns with Fliki AI’s core mission: to break down barriers and empower people to share their stories, products, and knowledge through visually appealing videos and compelling voiceovers.
Unlock Your Creative Potential: Start Your Fliki Free Trial
Experience the magic of Fliki AI firsthand by taking advantage of the free trial.
This risk-free opportunity allows you to explore the features, create your own videos, and witness the transformation of your text into engaging multimedia content. Embark on a journey of seamless content creation with Fliki AI today!
Conclusion: Fliki AI Free Trial
In a world where content speaks volumes, Fliki AI emerges as a game-changing solution for crafting impactful videos and voiceovers effortlessly.
With its intuitive interface, versatile features, and commitment to democratizing content creation, Fliki AI empowers both seasoned creators and novices to share their narratives in a captivating manner.
Don’t miss out on the chance to explore Fliki AI’s potential
In the realm of smartphone customization, the ability to adapt even the tiniest details can significantly enhance your digital experience. The size of your keyboard, for instance, plays a crucial role in your typing comfort and efficiency. Samsung, a pioneer in user-centric innovations, has provided a solution that allows you to tailor the keyboard size according to your preferences. This guide will walk you through the steps required to seamlessly adjust the size of the Samsung Keyboard, putting the power of personalization in your hands.
By exploring your device’s settings, you’ll uncover the means to resize the keyboard, whether you’re looking to maximize screen real estate for larger keys or seeking a compact layout for one-handed usage. Whether you’re a swift typist or someone who values precision, this functionality empowers you to fine-tune your interaction with your Samsung smartphone. Join us as we delve into the intricacies of resizing the Samsung keyboard, and unlock a new level of comfort and efficiency in your digital communication.
Adjust the size of the Samsung Keyboard
- Open the Settings menu, scroll down, and tap on the General management option.
- Then, tap on Keyboard list and default.
- Now, click on the Samsung Keyboard option.
- Here, scroll down and tap on Size and transparency.
- Finally, you can drag the handles on the sides of the keyboard to adjust its size.
We hope that this article has been able to provide you with some helpful tips and tricks for How to adjust the size of the Samsung Keyboard. Now you can share your experiences or capture important information without any hassle!